
This is probably a question that goes back to the earliest days of civilization. When ‘early man’ started fashioning tools and weapons, he no doubt needed to break through the ice to access the crucial food swimming beneath. But how?
Ok maybe we won’t go back THAT far, but there is a rich tradition when it comes to spearfishing through the ice. It’s pretty safe to say ‘early man’ figured it out, which means any modern man will be able to as well. Just follow along this easy tutorial.
Darkhouse spearing simply involves drilling a big enough hole to put down a moving decoy to lure fish, then covering it with a dark enclosure in order to launch a metal spear at said fish.
As a lifelong angler, I can tell you that 'darkhousing' is simply the most exciting method of ice fishing that every hardwater angler should experience if the opportunity arises. It’s staring into a huge aquarium with a deadly weapon, and will stick with you forever.
One thing worth noting is that there isn’t a huge industry or range of products that are widely available for dark house spearing. Most of the necessary gear is provided by craftsmen and artisans in smaller shops, so the decoys and spears, in particular, are beautiful works that vary widely. You will find them online, and be supporting small businesses by and large.
The rules and regulations surrounding this type of spearfishing will vary from region to region, if legal at all, so it is critical to know and understand them for your own individual area. Outside of that, there are a number of commonalities across the board. Here are a few FAQs:

Is there a specific number of spear tines used? No, simply put. It can range from 1 to 9, but in general you will find them with 5 to 7 tines, typically either cut from sheet metal or forged from hardened steel. Handles are usually steel as well, but may also be wooden.
How big should the hole be? It is usually 3 feet by 2 feet, though that can vary according to your setup. Just bear in mind that a human can easily slip through these openings into the icy water. This brings us to our next point:
What safety precautions should be taken? Of course proper spear handling is at the top of the list. Spears should always have keepers on the tines when not at the ready, and the spear should be tethered to the person throwing it or a fixed object. Always be aware of where that line is to avoid tangling or tripping.
There are a few critical precautions that are fairly obvious like floatation devices or full ice suits, and good footwear traction via good boots or cleats. Then there are issues like leaving enough snow around the hole to provide better footing, as once the ice begins melting it can become dangerously slippery. If you’re on a wooden floor that’s different, but make sure you have safe footing next to the hole at all times.
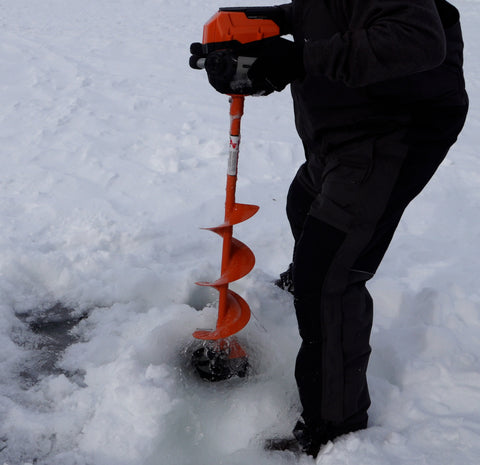
What equipment is used to drill the hole? While one can pull out the chainsaw and have at it, bear in mind that it introduces things like chain oil and exhaust residue into the water. Making multiple holes with an ice auger is an easy way, provided you have an ice saw to cut between the holes.
It’s best to cut out two major chunks that you will either pull out with oversized ice tongs, or push the chunks under the ice, which can present its own issues as it may offer hiding spots for nearby fish. Creating the proper size may involve a bit of trial and error, but you’ll find the right method of clearing the way once you’ve done it a few times.
How big should the enclosure be? It should offer enough room for two or more people to sit comfortably and be able to stand and launch the spear. Again, these will vary wildly from standard old tin or wooden fish houses to numerous pop ups, some of which are made just for spearing, like this Clam Spearfisher. Of course, even the high end fish houses like Ice Castles featuring options for spearing holes.
How deep should the water be? It should be in the 7 to 10 foot range, which leaves ample room for the spear, yet not too deep that the fish spook before the spear lands. Look for a solid bottom, as too many weeds will create a bit of a mess, and camouflage the fish more.
What type of a license is required? That will vary, but generally if you have a regular angling license in that state, you will simply need a spearing license or tag for your house that is fairly inexpensive.
Now let’s break down some of the NECESSARY GEAR in further detail.
(Image below from Modern Carnivore)

The Spears
Oh yeah, this is the fun part. The best ones are forged steel with barbs shaped into the tines that will last much longer than the ones cut from steel with the barb simply sliced from the side of the tine. A good durable darkhouse spear can double for spearfishing in the spring, for instance. We used to spear suckers in smaller streams in the spring, and those rocks pummeled the spears, but the better ones held up;)
The handles will tend to be 5 to 6 feet long and are usually all metal, but they may also be partly wooden. It’s almost best to think about them more like a good pool cue, as balance is crucial, and it really doesn’t take much force to send it with lethal results.
A decent enough one will start at about $50 up to $200, and north of that for a higher-end custom spear. It’s a relatively affordable startup cost when you consider those spears can always be repaired and will last for years. They even make beautiful wall art. Some makers will ask that you please USE the spear, as too many wind up on the wall of your crazy aunt’s cabin just for effect. Tsk.

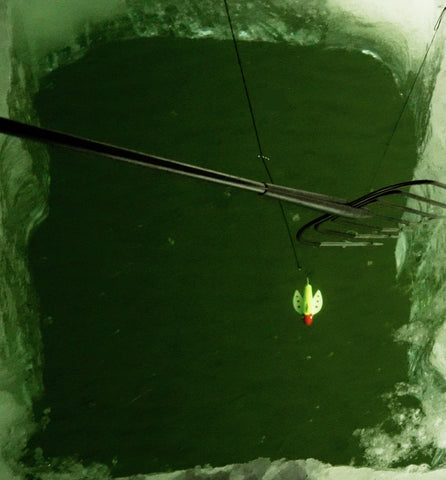
The Decoys
Spearing decoys are as essential to the process as the spears themselves, and you’ll find them in as wide an array as you would expect with most hard body lures. The fun thing is these are often unique, hand crafted baits that are specialized to swim in a circle. Given this, they all feature a curve in the body and fins. White is a pretty standard color, but you’ll find them in most colors, let alone the endless array of custom options. Those become keepsakes.
You’ll do best finding the decoys online, as even many bait shops won’t typically stock them. Years ago I tried to find one as a Christmas present for my father-in-law, and they gave me a blank stare. Believe me, the artisans and craftsmen that make these will appreciate the effort. Here’s a story that illustrates both the art and science of decoys: Fish Stories: The Decoy Man.

So now you need this decoy to swim. Typically the old wind-up wooden ice fishing rod makes a perfect tool for this, though most anything that gives you control will do the trick. Simply bob the line up and down and the decoy should make nice circles, either wide or tight depending on how high you raise the line. It’s basically mimicking a baitfish in peril, or one that is simply hanging around when you occasionally just let it hang there.
One key is to leave enough room under it as the fish prefer to ambush prey from beneath. Pike will typically want to get under it to examine it further, if they don’t outright hit it and realize it ain’t made of fish. That’s when it’s time to throw the spear, son. Godspeed.

The Teaser
The main purpose of the teaser, or flasher, is to provide a bit of flash to catch the eye of wary fish, and hopefully draw their attention to the decoy. It should be hung lower than the decoy, and should rotate if possible. To do this there are slow motors that are inexpensive and made to attach easily to your structure. Otherwise I’m guessing if you have a rotisserie motor on your gas grill that might work. Just spitballing here.
The Tools
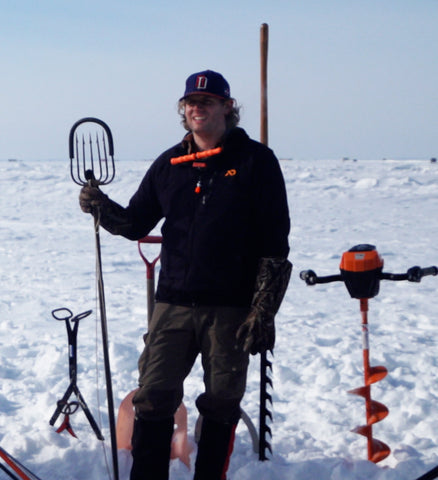
First and foremost would be an ice auger, or chainsaw if you lack an auger.
Ice saw is used to cut between the multiple holes you’ll typically drill. Again, these are custom saws designed for this purpose, and they're actually fun to use.
Ice tongs will retrieve the ice chunks, though you’ll want to look for the oversized ones that will handle the massive blocks you cut. Again, you can also simply stamp them down and shove them over under the ice.
Skimmers are a necessity, and you’ll want a BIG one to clear all the slush. There are custom ones out there. (FUN FACT: an old snow shovel works well with holes drilled in it. You’re welcome.)
Floatation devices are a MUST, and why not use a Boreas Floating Ice Suit, as you’ll need good winter outerwear anyway. Always have floatation and ice picks with you, especially if fishing alone. Remember comfortable chairs too.

The Enclosure
Once again, this can range from a tin hut to a massive ice camper. The main objective is to provide a darkened environment to mask all the activity above the ice. It should be relatively quiet, so put away any noisy distractions.
Outside of that, all the creature comforts are up to you, whether that be a classic old airtight stove that will cook your lunch, all the way up to the latest insulated pop-ups designed specifically for spearing. Heat is another obvious necessity, though remember to watch the melting ice if you are set up on the snow. If you have the Boreas suit, you won’t need heat. Believe me.
Now the techniques for throwing the spear and all this preparation are available at a more in-depth level on the Modern Carnivore website under modcarn.com/hardwater-hunters
Mark Norquist will take you through all the steps through his seminars and online master class, not to mention all the other outdoor courses he covers through his work.
So happy spearing to you! It is an adrenaline rush you’ll want to coax over and over, not to mention harvesting some great table fare. Whitefish, in particular, make for great spearing and provide incredible filets for cooking or smoking. Look up how to cut around those Y bones on a pike, and those will cook up nicely as well.
So, for all those reasons, spear on!!! To see how the WindRider Why We Fish crew learned the process click here, and enjoy! -WR